Data Wrangling
This is a collection of tools that help reshape data across files and columns. Use them to look up values from another table, compare columns and reconcile differences, combine related files, and split large files into smaller ones.
Column Lookup
The Column Lookup is similar to VLOOKUP in spreadsheet programs. It can pull in data from other files or the same file.
With Column Lookup, there are two "key" columns that contain the same data, usually a unique ID. One contains the "from" (or source) keys and the other contains the "to" (or destination) keys. It looks up the values in the same rows as the "from" keys and places them in the same rows as their respective "to" keys.
You can decide which columns are the "value" columns, there may be more than one, and they do not have to be adjacent to each other. You can also decide where the values should be placed. When they are placed, they will be adjacent to each other, even if they weren't adjacent originally. You are also given the choice whether they should overwrite existing columns or new columns should be inserted.
If a "to" key doesn't have a matching "from" key, its values are left empty.
The command asks you to:
- Choose the source file.
- Enter the source key column.
- Enter the source value column(s).
- Choose the destination file.
- Enter the destination key column.
- Enter where to place the values.
- Choose whether to insert new columns or overwrite existing ones.
You can either type columns in (e.g. 3-6, 8, 10) or select them in the table. When selecting them, be sure to click back on the query and hit Enter.
Since there are so many steps, it lists out the previous responses. If you need to go back, you can click on them or hit Ctrl+Left.
Since there are so many steps, it lists out the previous responses. If you need to go back, you can click on them or hit Cmd+Left.
Example
Suppose we have this data in the "From" file.
ID (From) |
First Name |
Last Name |
|---|---|---|
1 |
Angus |
Young |
2 |
Cliff |
Williams |
3 |
Malcolm |
Young |
4 |
Brian |
Johnson |
5 |
Phil |
Rudd |
6 |
Bon |
Scott |
We set the ID (From) as the Lookup Key and the First Name and Last Name columns as the Source Value columns.
The destination file looks like this:
ID (To) |
||
|---|---|---|
3 |
||
5 |
||
6 |
||
1 |
||
2 |
||
4 |
When we set the ID (To) column as the Destination Key and its adjacent columns as the Destination Value columns, we get this:
ID (To) |
||
|---|---|---|
3 |
Malcolm |
Young |
5 |
Phil |
Rudd |
6 |
Bon |
Scott |
1 |
Angus |
Young |
2 |
Cliff |
Williams |
4 |
Brian |
Johnson |
Even though the IDs are in different orders, the values are with their corresponding IDs.
Compare and Reconcile Columns
Compare and Reconcile Columns
The Compare and Reconcile Columns feature compares the values of two columns (which may or may not be in the same file) and reports which values they have in common and which they don't. Then, you can do a variety of operations on them:
- Add values only found in one column to the other (option to include the other columns as well).
- Remove rows found only in one column.
- Remove the rows with items in common.
- Select either the common values or unique values in either column. Then, you can perform any Modern CSV operation on them.
The two columns are labelled A and B. For each side, you'll need to pick a file and a column within that file. Make sure the Number of Header Rows setting is correct for both. It is 1 by default.
You can pick a file several ways:
- Type it in the File field.
- Click the Browse button and browse to it.
- Click the Launcher button. It will show a list of the currently opened files, files inside a currently opened folder, and recently used files.
- Click the Current button. It will use the file that's currently opened in the main window.
- Drag and drop them from the file system.
Once you select files, you can select a column within each file. You can either click on a column in the list or click the Launcher button below to select from the launcher.
In comparing columns, you have the following options:
- Case sensitive
- Trim whitespace
The lists at the bottom show which values are unique to which columns and which ones are common to both. They also have buttons to take the actions listed above. Any actions can be undone with the Undo Last Change and Undo All Changes buttons at the bottom.
Merge Files
Merge Files
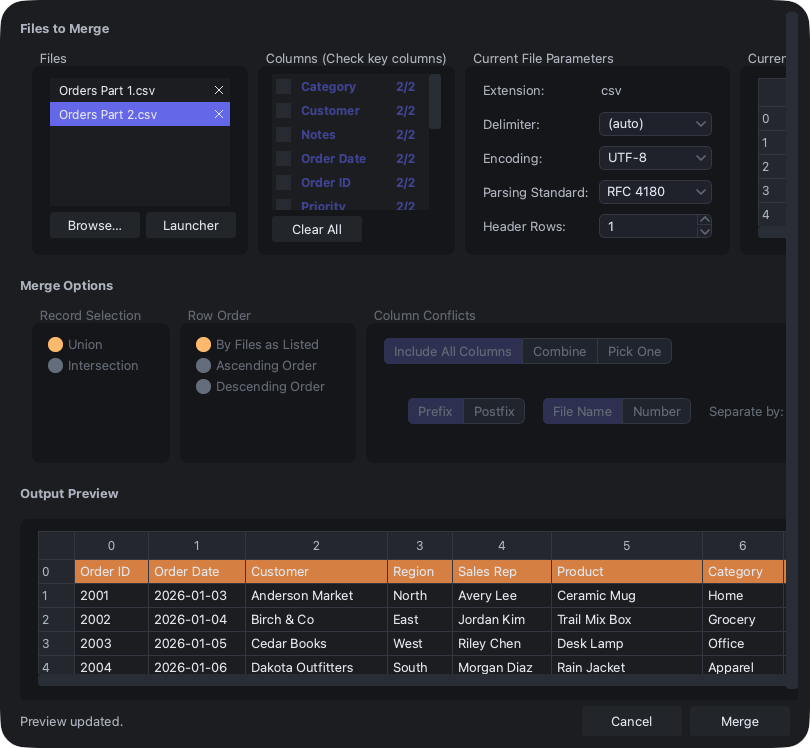
The Merge Files feature allows you to merge the data from multiple files into one. The window has three sections:
- Files to Merge
- Merge Options
- Output Preview
Files to Merge
Starting on the left side, you first need to tell it which files to merge. You can do so in several ways:
- Click the Browse button and browse to the file.
- Click the Launcher button. It will show a list of the currently opened files, files inside a currently opened folder, and recently used files.
- Drag and drop the files from the file system. You can drop multiple files at a time.
- Drag and drop a folder from the file system. It will add every file inside that folder non-recursively (i.e. only the files directly in that folder, not files inside its subfolder).
The Columns list shows all the columns found in all the files. The bolded and highlighted ones are found in the currently selected file. Optionally, you can check the ones that you want to be keys for generating records. The Clear All button deselects them.
The Current File Parameters section is where you can set the parameters for the selected file to ensure it's parsed correctly.
The Current File Preview section shows the currently selected file's contents. It's truncated to 500 rows.
Merge Options
When you select one or more columns in the Columns section (under Files to Merge), then they represent key columns. The individual values found in the key columns are the keys. The Merge Options section is where you decide how to form records (i.e. rows) with the keys.
When there are no keys (i.e. no columns are selected), the Merge Options section will be disabled. When merging, it will go through the files in the order they're found in the Files section. There will be one output row per input row.
When there are key columns, the merge options will be enabled.
Record Selection
Union: Include a record for a given key as long as it's found in at least one file. Intersection: Include a record for a given key only if it appears in every file. Otherwise, exclude it.
There can be only one record per key.
Row Order
By Files as Listed: It will, to the maximum extent possible, keep the orders of the keys the same as they're found within the files. Ascending/Descending Order: It will perform a multi-column sort with the first column in the Columns list being the most significant key column. The sort column key precedence decreases as you go down the list.
Column Conflicts
If two or more columns that share the same key also have the same column, that's a column conflict. This section is where you tell it how to resolve column conflicts.
The three options are Include All Columns, Combine, and Pick One.
Include All Columns: It will include all conflict columns, but give them different names. You can prefix or postfix the column names with their file name or an incrementing number. You can also pick a separator character.
Combine: It will make a single column and then separate the values by some separator that you pick.
Pick One: You can either pick a file whose value will be the default for conflicts or have it pick the first file with a non-empty value.
For the Combine and Pick One options, there's also an option called Special Handling for Numbers. If selected, it can aggregate numerical values by either their sum, mean, median, min, or max. It can also display their min/max range (e.g. 30.9 - 38.2).
Output Preview
This shows approximately what the output will look like. If all the input files are short, it will be exactly what is output. If they're longer than 500 rows, then it will be an approximation.
Split File
Split File
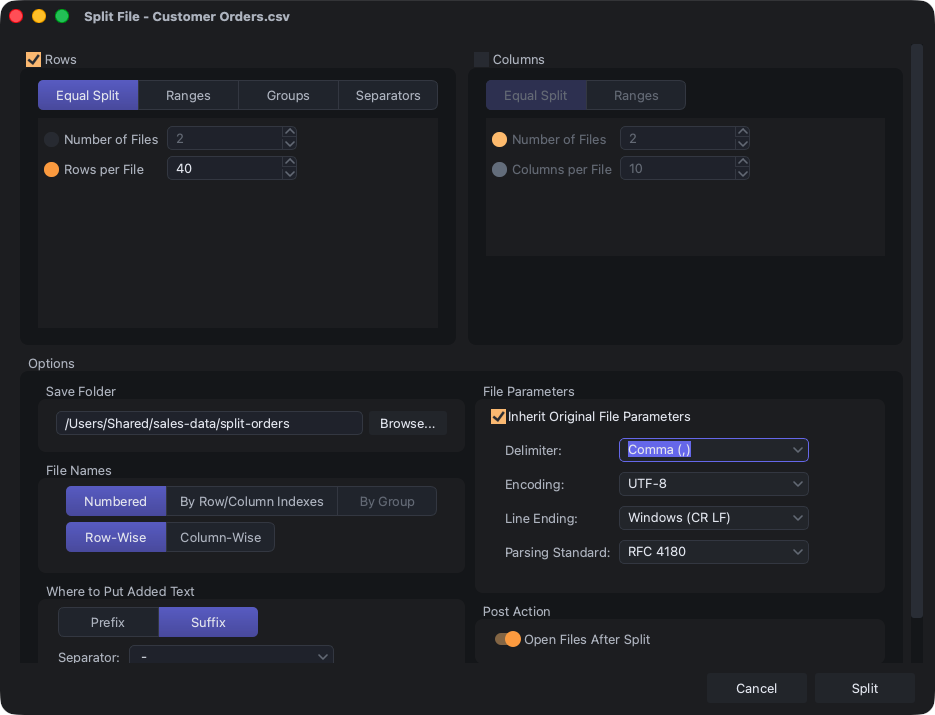
The Split File feature allows you to split a file into multiple smaller files. You can split it by row, by column, or both. There are a number of criteria you can use to determine which row and which column to split by.
There are also options to determine where to save the files, what to name them, and what their file parameters (delimiter, encoding, etc.) should be.
Split by Rows
If the Rows section is checked (it is by default), then you have 4 ways to determine the row boundaries:
- Equal Split
- Ranges
- Groups
- Separators
Equal Split
You can set one of the following:
- Number of files to split into
- Number of rows per file
- Approximate size of each file
Ranges
You can explicitly list out which rows to split the file at. If you want a split at every selected row, you can click the Use Selected Rows button and it will automatically fill in the field for you.
Groups
You can pick a column to evaluate and then it will group that column by some criteria.
Value: You can have it create splits every time the value in the selected column changes or have it sort that column and create a split for each unique value.
Starting Letter: This is only available for non-numeric columns. If you want to group entries in the column starting with A, then B, then C, and so on, you can use this option. By setting the Number of Letters per Group setting (or Number of Divisions), you can group multiple starting letters (e.g. A, B, and C in one group, D, E, and F in the next and so on). You can also explicitly list which letters define the group boundaries.
Numerical Value: This is for numerical columns only. You can either set an even numerical interval or the number of divisions. Either way, the number span across each file will be the same, so if the numerical distribution is uneven, the resulting files will have inconsistent row counts.
Separators
The Separators option is useful if your file has some kind of separator you want to split by. It can either split when an entire row is blank using the Blank Rows option or it can split when some column has some value that you define with the Rule option.
Split by Columns
If the Columns section is checked (by default, it is not), then you have 2 ways to determine the column boundaries:
- Equal Split
- Ranges
They behave just as the Equal Split and Ranges options do for rows.